SNMP stands for simple network management protocol and it’s used for monitoring and gathering information
about connected network devices using UDP ports 161/162. There are currently 3 flavours of SNMP:
⁃ SNMP version 1 (SNMPv1)—This was the original implementation of SNMP which provides authentication
based on a community string (password). However, this password is sent via clear text meaning it isn’t encrypted,
therefore not secure.
⁃ SNMP version 2 (SNMPv2)— Often referred to as SNMPv2c, this version was improved to support more
efficient error handling and performance. Both SNMPv1 & v2 use simple authentication using community strings.
⁃ SNMP version 3 (SNMPv3)—This version improves security and privacy by having the ability to send
encrypted messages and also defining what a particular user can view and have access to. However, this
does mean that SNMPv3 is a bit more difficult to configure.
Because we are going to be configuring our Linux box to be connecting to a security device (the Cisco ASA
if you haven’t been following along), Part 1 (DHCP) is here and part 2 (NTP) is here –
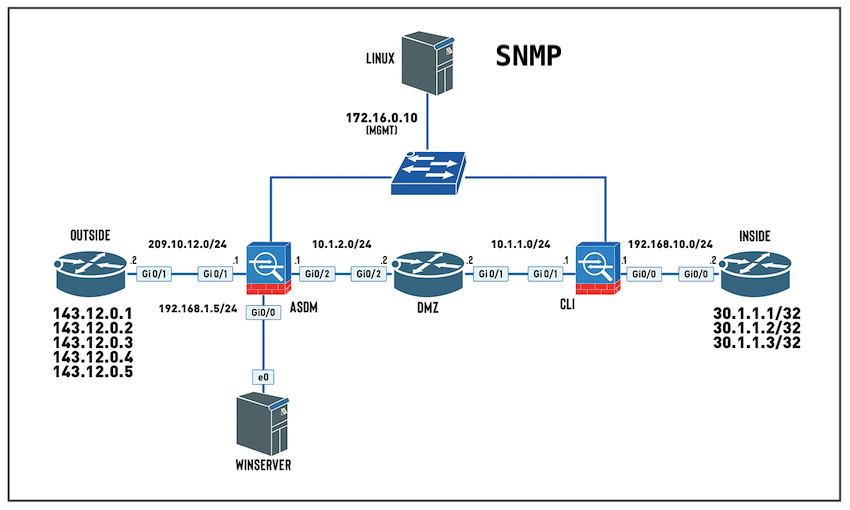
then we are going to be using SNMPv3. Let’s take a look at our topology:

We can continue on from the last lab, but we need to now install SNMP on the Linux box

We type Y and press enter

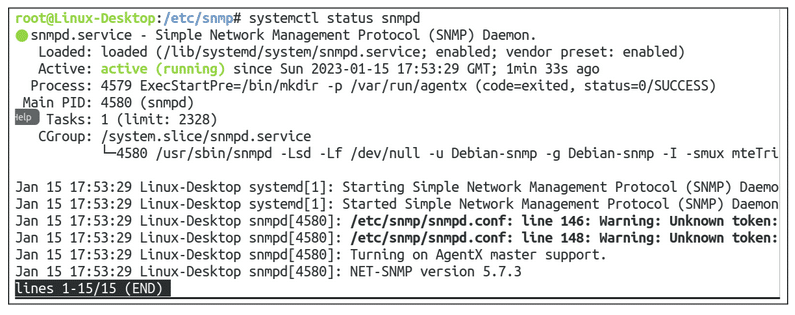
Then we verify that the SNMP daemon has been installed and is currently active and running:

We use ctrl+C to escape from the screen above 😉
OK, so far so good 🙂 Next step is to change the agentAddress in the snmpd.conf file to allow all connections and comment out the line
specifying local connections only. Then we will create a new user specifying the authentication type (SHA in our case) followed by our
password, and we will also be using encryption which requires a privacy protocol (we’ll be using AES) – again followed by a password.
Lot’s going on in this little section – let’s take a look at that on the CLI:
Step 1: Let’s navigate to the directory that contains the configuration file we want to adjust:

Then let’s make sure that the snmpd.conf file is there:

Yup, we can see that the file is there – now all we have to do is use our favourite text editor to configure the file. I will be using nano:

Step 2: We need to comment out this line (which means adding a # to the beginning of the line so that’s it’s not read from the file)
– starting with agentAddress udp:127.0.0.1:161, and remove the hash from #agentAddress. Udp:161,udp6:[::1]:161
NOTE: To add a # if you’re using an Apple MAC use alt+3:

Step 3: Then we need to create a new user specifying the authentication type and privacy protocol including their passwords –
I’m going to give the user read/write access:

Then we close the texteditor – for nano we press ctrl+x, then answer Y…

… then press enter if we are happy to save the file under the current filename.

After modifying the snmpd.conf file then we need to stop and restart the snmp process. To do this run the following commands:

And let us verify that the snmpd process is up and running:

It looks like we have everything we need in regards to installing and configuring SNMP or our Ubuntu server.
If you just came for the Linux SNMP config you can move part 4 here. As for the rest of us we will continue on to the Cisco ASA configuration
and testing this out with SNMPWALK.
What is SNMPWALK?
SNMPWALK is a CLI application for SNMP used to query a network device for information. I’ll be using SNMPWALK to verify that we have an
SNMP connection and then any other NMS (Network Monitoring System) that is connected to the network (Solarwinds, Cisco Prime, PTRG,
Observium, etc) should be able to connect to the device using SNMP and be able to query the system. So we will configure the ASA for SNMP
and then use SNMPWALK to verify the connection. Let’s have a look at our topology again:

OK, let’s jump straight into the Cisco ASA SNMPv3 configuration:
snmp-server group admin v3 priv
snmp-server user Ibraheem admin v3 auth sha Password priv aes 128 Password
snmp-server host MGMT 172.16.0.10 version 3 Ibraheem
wr mem
Let’s see what the config looks like on the Cisco ASA:

And let’s look at what OIDs are available on the device – where an OID stands for an “object identifier” – meaning what objects can be monitored for the device.

OK, let’s go and do the SNMPWALK config on our Ubuntu box where we will be using the following parameters:
snmpwalk = SNMP application
-v3 = specifies what SNMP version to use (1, 2c, 3)
-l = sets the security level (noAuthNoPriv | authNoPriv | authPriv)
-u = set security name
-a = set authentication Protocol
-A = sets authentication password
-x = sets privacy protocol
-X = set privacy password
Then at the end we will add the device IP address and optionally an OID.
Let’s see that in action – we’re going to be using the OID that monitors the system uptime:

And when we jump onto the Cisco ASA itself:

Wow. I’d say that that worked quite well 🙂
